Ender 3 Bed Leveling: The Paper Method, and When to Add a Probe
LayerWalker is a participant in the Amazon Services LLC Associates Program. We may earn a commission when you buy through links on our site, at no extra cost to you.
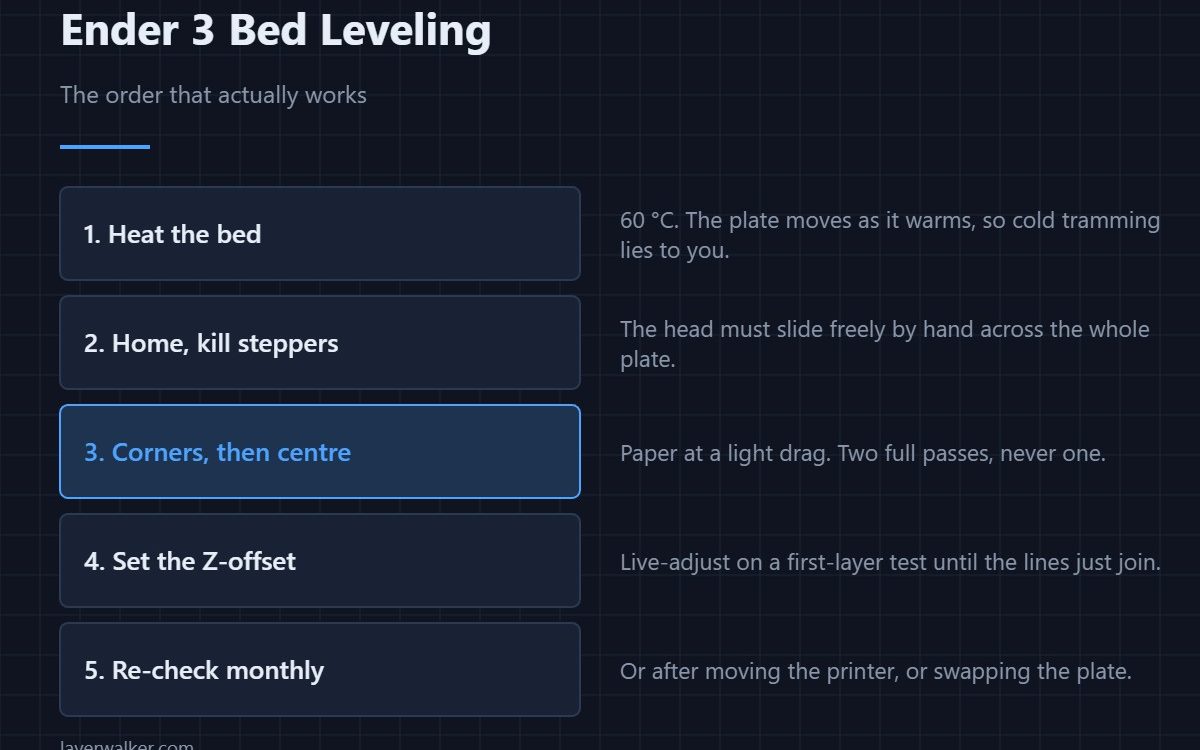
Ender 3 bed leveling is a four-knob job you do properly once, not a ritual before every print. Heat the bed to 60 °C, home, disable the steppers, then set a sheet of paper to a light drag at the four corners and the centre — twice round. Set the Z-offset afterwards. If the plate itself is bowed, no amount of knob-turning will fix it and you want a probe.
Almost every first-layer complaint on an Ender 3 is one of two separate faults wearing the same costume. Either the bed is not parallel to the path the nozzle travels, which the wheels fix, or the aluminium plate is not flat, which they cannot. Telling them apart takes one test and saves a lot of wasted filament.
Where to buy


Ender 3 bed leveling, step by step
- Heat the bed to the temperature you actually print at, usually 60 °C for PLA. Aluminium moves as it warms, so a cold trim is a trim of a different bed.
- Home all axes, then disable the steppers from the menu. The head has to slide freely by hand.
- Move to each corner about 10 mm in from the edge. Slide a sheet of ordinary printer paper under the nozzle and turn the wheel until you feel a light drag — the paper moves, but scratches.
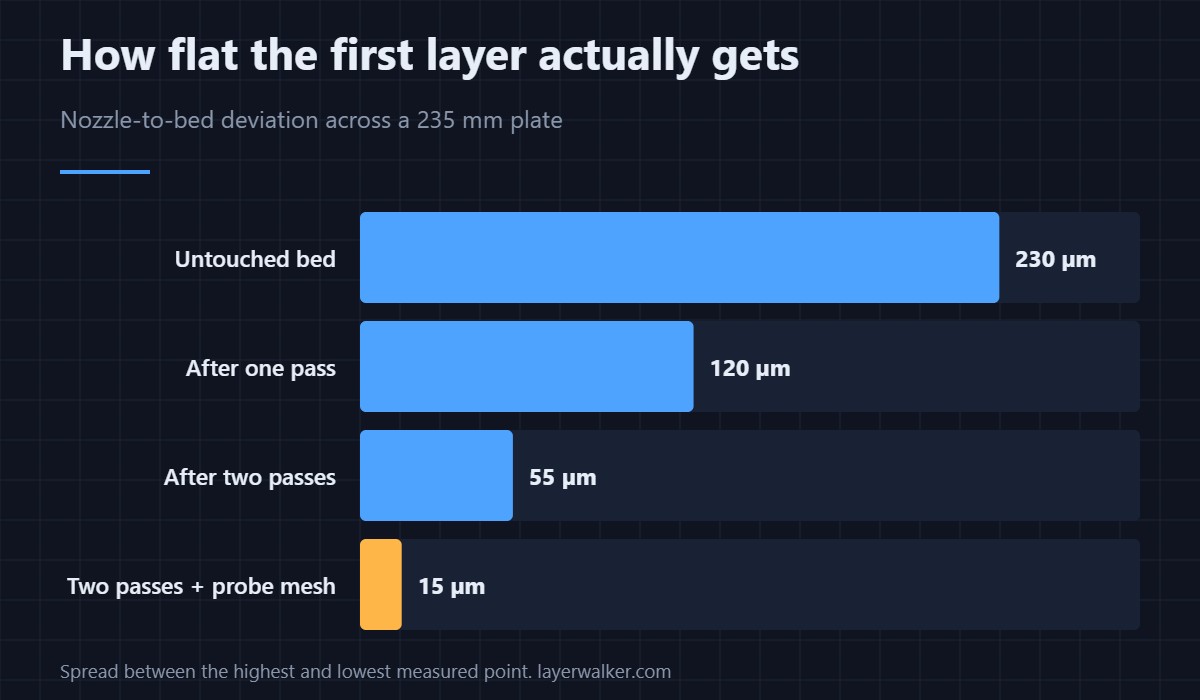
- Go round a second time. The first pass always disturbs what the previous corner did, because the springs interact.
- Check the centre last. If the centre is tight when the corners are right, the plate is crowned and you have a flatness problem, not a leveling one.
- Set the Z-offset with a live first-layer test. Leveling gets the plane right; the offset gets the squish right. They are different settings.
What the paper is actually telling you
A sheet of copier paper is about 0.1 mm thick, which is close enough to a first layer height to be useful and cheap enough to throw away. What matters is not the exact gap but that the same drag is felt at every point. Consistency beats accuracy here: a bed that is uniformly 0.05 mm low is fixed with one Z-offset tweak, while a bed that is right at the front and loose at the back cannot be fixed at all.
If the stock springs feel spongy, replace them with stiffer yellow springs or solid silicone spacers. The stock ones compress unevenly as the bed heats, which is why a printer that was perfect yesterday is not today.
Ender 3 auto bed leveling: when the knobs stop being enough
Fit a probe when the centre and the corners disagree after two honest passes, when you have swapped to a glass or PEI plate that is not perfectly flat, or when you simply do not want to check it again. A probe measures a grid of points and lets the firmware follow the surface as it prints, so a gentle warp stops mattering. Which sensor to buy, and what your board needs to accept it, is covered in the bed leveling sensor comparison.
What a probe does not do is tram the bed for you. It has a compensation range of a few tenths of a millimetre. Tilt the bed beyond that and it will happily print one corner in the air.
How to calibrate Ender 3 settings after leveling
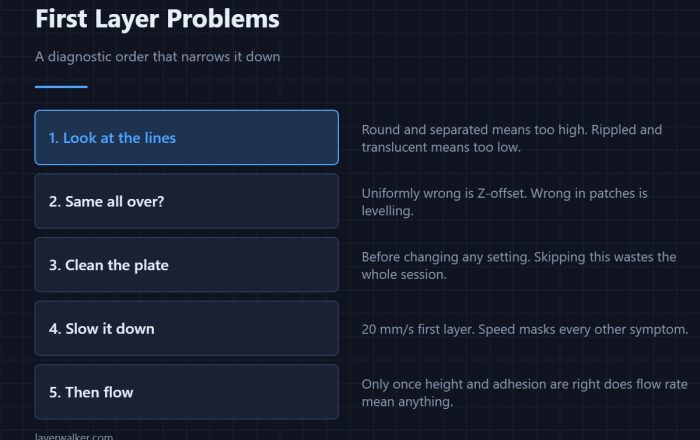
Leveling is the first of three things, and people stop after one. Once the plane is right, run a first-layer square and adjust the offset until the extruded lines just touch with no gaps and no ridges. Then check that the plate is clean — finger oil defeats a perfect level completely. Only after those two should you start blaming adhesion settings or filament.
Ender 3 Bed Leveling FAQ
How often should I re-level an Ender 3?
With solid spacers, roughly monthly, or after you move the printer. With the stock springs, expect to check every week or two. If you are re-levelling before every single print, something mechanical is loose — usually the eccentric nuts on the bed carriage.
Does the Ender 3 V2 level any differently?
No. Ender 3 V2 bed leveling uses the same four wheels and the same procedure; the larger knobs are just easier to grip. The V3 SE and KE ship with a probe and level themselves, which is the main practical difference between the current Ender 3 models.
Will a CR Touch fix a warped bed?
It compensates for a warp, which is not the same as fixing it. Within a few tenths of a millimetre the mesh hides the problem completely. Beyond that the head is chasing a surface it cannot reach, and you need a flatter plate instead.
Why does the first layer change after the bed heats up?
Because you levelled cold. The plate bows slightly as it expands and the springs relax. Always trim at printing temperature, and give the bed five minutes at that temperature before you start.

LayerWalker
Print defect diagnosis, calibration procedures and parts that actually fit. Corrections welcome through the contact page.